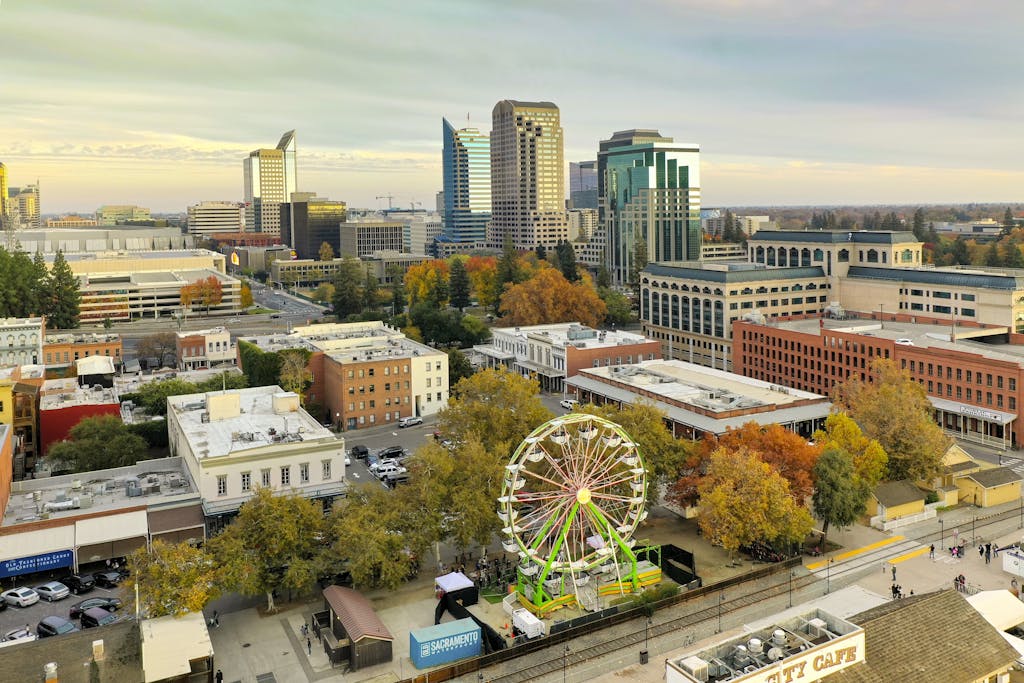
How to take Beautiful Food Photos with Artificial Light

How to take Beautiful Food Photos at night with artificial light

You guys!! I’m so flattered. Beyond flattered, actually. Many of you have reached out begging for me to share my food photography tips and while I’ve been dragging my feet, feeling not good-enough, you all have persisted!

Self-doubt is an awful thing. And too often we are far more critical of ourselves than others are. Like with my own food photography.

I still have so much to learn and actively work every single day on improving, but that doesn’t mean that I’m not ready to share what I’ve found that works for me, right?!?

Photography is a form of art. And with all types of art, there’s no one perfect way to execute any given finished piece. Ask 10 different food photographers their process for shooting with artificial light and you’ll certainly get 10 different answers.

Composition and the beauty of any piece of art, whether it’s a photo or a unique recipe book, is always going to be subjective, but there are key factors that most will agree to be universally appealing.

The reason I’ve decided to dip my toes in the food-photography blog post pool with how I use Artificial Light is because it’s the one area that’s the hardest to figure out for most newbie food photographers.

And to be honest, it gets really expensive to keep trying (and failing) to find the perfect set up.

I’ve had those large professional umbrella stands with lights on them. I’m pushed them around our small house and all I got in return was bad photos. I’ve spent more money than I care to share on lightbulbs, lights and reflectors.

While I think that learning from our mistakes is definitely a key element of the process, there’s no reason you can’t jump ahead, eliminating the expensive mistakes I’ve made, and use my tried and true, works every time, method.

That won’t break the bank. You can get started with the simplest version of my lighting set up for about $100, with the full monty for about $200.

Not bad, huh???

Perhaps the best part is that you don’t need a dedicated studio-room, the lights don’t take up a bunch of space in your house and can be easily stored/set up. They are small and easy to use.

From the moment I turned on THESE LIGHTS and took my first photo I was in love. It was the best food-photography investment I had made, next to purchasing my first DLSR and nifty fifty.

Oh and FYI, I don’t use a tri-pod either!!!!

How to take Beautiful Food Photos at Night with Artificial Light

Now, promise you won’t laugh. But I shoot my artificially lit, food photos at night, in my office closet.

How to take Beautiful Food Photos at night with artificial light

My dedicated artificial light setup up happened as a part of my office remodel that I’ve been working on (the big reveal coming mid-Dec)… My office closet had been overflowing with stuff; crammed and packed, overflowing every single time I opened the door. But since I’ve gotten organized thanks to my new gorgeous bookcases.. my closet is now neat, tidy and organized too.

I’ve also significantly reduced the clutter and needless items I was hanging on to, donating so many things feels awesome!

Anyways, opening up 1 shelf in my office closet was all the space that I needed to create the PEFECT area for a dedicated artificial lighting set up for not only shooting at night, but anytime that I have less than optimal natural light available.

How to take Beautiful Food Photos at night with artificial light

This snuggle season mug photo (above) was taken this morning at 9:15 am in December, in my office closet. For reference using my 55 mm lens, ISO 125, f/2.8 aperture, shutter speed of 1/80 and white balance on Auto. This photo has not been edited, other than to add my watermark, it’s straight off the camera

Here’s another example:

Low-Carb Keto Salted Butter Pecan Cookies

This photo (above of my Salted Butter Pecan Cookies) was shot at 6 pm at night in December. In my closet, using the same set up as the snuggle mug photos. For reference using my 55 mm lens, ISO 125, f/2.8 aperture, shutter speed of 1/80 and white balance on Auto.

Drumroll please…. here’s the behind the scenes of my setup up for office-closet-food-photography-studio…

How to take Beautiful Food Photos at night with artificial light

Now let me walk you through this glamorous setup.

Stop laughing.

I know it’s not glamorous, but the photos you shoot certainly feel like it though!

  • Shelving unit: I didn’t purchase this shelving unit to create this space, it was already in my closet for storage. As I cleaned out the closet and had the lights setting there, this idea came to me!
  • 1 Base & 1 Background Board: I use White Boards from Ikea’s clearance section, $10 each, they were like cabinet doors or shelves, not sure. Roughly 30 by 18.  I choose plain white so that it’s extra bight and reflective. I went with boards so that I can wipe them down and they won’t bend. White foam core boards will work too at $1-$2 each, but they will damage and stain. You can also use traditional wood or painted background boards, if desired. I prefer my basic set up to be neutral and use linens and props for variety instead of swapping out boards.
  • 2 Lights: Lowel Ego Table Top lights, about $100 each. Comes with 2 bulbs. Light can be further diffused, if desired, by putting a white t-shirt over the entire light or clipping a white cloth over the front. I like to angle them slightly and tip at least 1 forward to direct the light. I’ve had these since 2015 and the bulbs have not burned out. I did NOT purchase these lights for this set up, I have been using these lights in many different ways but this is the easiest, compact, winter-nighttime set up that’s budget friendly and easy for beginners to have immediate success.  For the $100 budget friendly beginner version, just purchase 1 light and use the white board that comes with the light on the opposite side to reflect the light. 
  • 1 Reflector: I have several of these pop up style reflectors, again, I didn’t buy it specifically for this set up, but thought bouncing so light down onto the area would be perfect. The reflector is just squished into the bottom of the shelf above. This one is a 24 inch round and is about $10

So…. yeah, that’s it. Easy Peasy, right??

Now I get it, everyone doesn’t have an office and the same size/set-up in a storage closet.. but this can be done in a corner of your basement, in a spare bedroom or set up pretty much anywhere….

And the investment is very affordable, knowing that this system works universally and you won’t struggle or regret the purchase.

Need a little more than a few photos to fully “get” my set up, watch this quick iPhone video I took, touring you through my closet set up.

My Artificial Light Photography Workflow:

Don’t worry, I’m not going to leave you hanging!! Of course there’s more to it than just plugging in some lights in your closet, you might need help with camera settings too! The best way I found to learn is to ask other photographers for their camera settings on photos that I admired, then created my own workflow to consistently get the results that I wanted:

  1. I set up my food/item as desired… normally with a linen or other props for balance.
  2. Turn on the artificial lights, turn off the closet lights and shut the door. When shooting with artificial lights, you want ONLY those lights on. Eliminating all other forms of light is essential, which is what makes a small area, like a closet, ideal.
  3. Grab my camera, and if you noticed in the details about each photo (above) the setting that I use are the EXACT same. Which is part of the beauty of this setup.  Oh and yeah, you’ll be in your camera’s manual setting. Your settings may not be the exact same, but they will be very similar. You want to shoot in RAW, if you camera has that capability.Tips to setting your camera: (1) Set your white balance on auto, I exclusively shoot in auto. (2) Set your f-stop, the lower the number (wider the aperture) will yield a more buttery-blurry background and allow the most light into your camera, I use f/2.8 for 90% of my photos. (3) By default I keep my shutter speed at 1/80 or 1/100 , those are the slowest shutters for hand held shooting with a 50mm lens. The slower the shutter (1/80 is slower, compared to 1/400 which is faster) allows more light into the camera but also with slow shutters you run the risk of blurry photos if you can’t hold steady. 1/80th is the lowest I can shoot handheld while maintaining good focus, the only time I change my shutter speed is for taking photos of people or capturing motion in special situations. (4) Lastly, I adjust my ISO based on the situation; you want to keep your ISO as low as possible for the best photos. I use metering to find the perfect ISO, my personal preference is metering at +1 (slightly over exposed aesthetically). Generally speaking with these camera settings (shooting in artificial or natural light) I always shoot under ISO 1000, any higher you run the risk of grainy photos.
  4. Transfer photos to Lightroom and make any necessary edits. With a consistent lighting setup, you’ll find that your photos will be better and requires less editing as you perfect your own camera setup.

Why I ditched my DLSR and switched to Mirrorless Camera

The major reason I switched to a mirrorless camera is that you can see a close representation of your final photo in the viewfinder/screen in live view, which makes it easier to take better photos. Unlike DSLR cameras where it’s more of a guessing game. Also the mirrorless bodies are significantly smaller and lighter.

If you are just getting started with food photography I recommend THIS entry level mirrorless camera (it’s my back up, travel and overhead video camera) and if you are more experienced (and/or have a bigger budget) I simply love THIS MIRRORLESS CAMERA and it completely transformed my photography. As for lenses, you can’t go wrong with a nifty-fifty; I use THIS 55mm LENS 75% of the time for food photography, if that’s out of your budget range try THIS BUDGET FRIENDLY option.


How to take Beautiful Food Photos with artificial light

Similar Posts

One Comment

Leave a Reply

Your email address will not be published. Required fields are marked *

This site uses Akismet to reduce spam. Learn how your comment data is processed.