My Favorite Things for a DIY Pedicure
After reading this post about My Favorite Things for a DIY Pedicure you’ll have all the best pedicure at home ingredients lined up to get your feet looking better than ever without a salon appointment! Saving you both time and money.
I’m really exited to (finally) find the time and excuse to write a for-fun blog post that isn’t about optimizing SEO or chasing traffic. The sole purpose of this post (and others in this series) is to serve as a way to compile a list of my favorite things by category to easily share with you all.
We all took up a wide variety of hobbies during the pandemic, for me once I ditched diet culture, I got really serious about improving my manicure and pedicure game spending lots of time focused on nail care . It was a great way to practice self care while learning a new skill that I can help you also incorporate into your busy schedule!
Yes, the good news is that even if you suffer from a lack of time, you can still have healthy nails with a DIY pedicure at home!
At this point, I am confident in my skills and no longer look to professionals with jealousy; my DIY manicures and pedicures are (in most cases) better than most salons can provide. I’m not saying that to put down any nail professionals, there are some with serious talents, but overall you are most likely to encounter average services at best.
This post is dedicated to sharing my Favorite Pedicure Products and I hope it’s helpful to upping your pedicure game!
My Favorite Pedicure Tools
Let’s start at the bottom and work our way up, our first step is talking about my favorite pedicure tools. Although I prefer to do a “dry” manicure to ensure longevity of my polish, it’s not as imperative when doing a pedicure. You can feel confident including a soothing and softening soak prior to painting those piggies!
A Heated Foot Bath will make a world of difference in your DIY pedicure at home. No more heating water separately and trying to find a bucket, basin that your feet will fit into! This handy unit heats the water and provides a soothing massage bottom. The best part is that you can sit back and relax while watching TV without worrying about your warm water cooling down, since it heats the hot water!

AND despite what you might think, THIS FOOT BATH is extremely affordable – costing less than one pedicure at a salon!! Oh and if you tend to be ‘messy’ like me, I put down a big absorbent bath mat (instead of just a towel) so that I don’t worry about having a wet mess on our living room rug when relaxing!
My Favorite Foot Soaks, Scrubs & Soaps
After filling your heated foot bath with water, the next question is what else should you add to the water??! You can do really easy additional like a little fresh lemon juice, lemon slices, coconut oil, bath salts, couple tablespoons of olive or a wide variety of other options but IMHO non of those will give you the beautiful feet you are looking for!
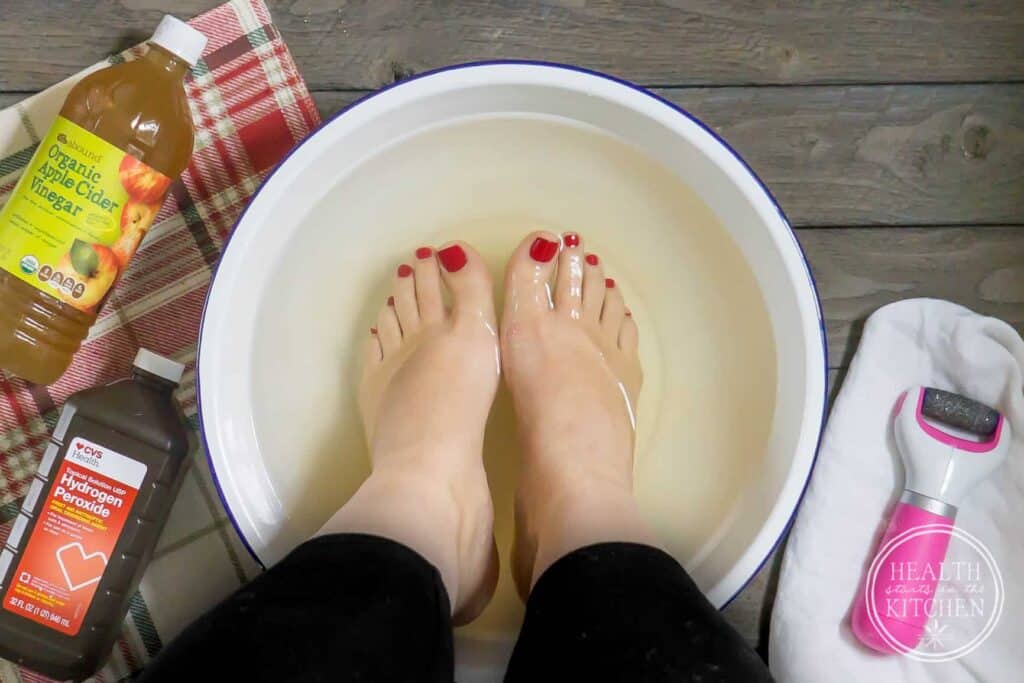
- My Apple Cider & Hydrogen Peroxide Soft Foot Soak Recipe uses 2 natural ingredients as a DIY foot soak that helps to dissolve hard calloused skin for baby-soft feet.
- Epson Salts with Lavender for an epsom salt soak (not rock salt)
- Magnesium Flakes
- Olive & June Mani Pedi foot Scrub
- Dr Bronners Tea Tree Castile Soap
- The Smoother Glycolic Acid Exfoliating Body Wash By Naturium
- Magnesium Body Wash with Peppermint and Rosemary Essential Oils
- A few drops of an essential oil. My favorite Essential Oils for a professional pedicure are: Tea tree Oil, Lavender Oil and Peppermint Oil. (great addition if you have a fungal infection)
After my feet have throughly soaked, I give my nails a quick scrub with THIS NAIL BRUSH to loosen any dirt that may be present. You can use an orangewood stick or similar to clean out from under your toe nails at this time too.
My Favorite Foot File(s)
After a good soaking, it’s time to slough off all that rough and calloused dead skin (dead cells, yuck) off your feet (this is my favorite part of a DIY pedicure, it really transforms my feet from blah to beautiful. I have 2 foot files that I use and recommend. Long gone are the days of using a pumice stone during a home pedicure! We’re pulling out all the stops with much more effective tools just like a nail salon for beautiful, happy feet!
Hands down for a traditional “cheese grater” style foot file Olive and June’s Foot File is the absolute best for removing dead skin cells. I don’t know if it’s just sharper than others, or what the difference is, but after using countless others it just removes the most dead skin AND has a plastic catcher on the back to make less of a mess. The only issue is that it is not currently available on it’s own, you can only purchase it as a part of their Foot Care Essentials Set OR as a part of their Pedicure System. But that’s not a BAD thing because I sincerely love their other products too and I am confident you will as well!
Using a Glass Foot File is a newer tool in my pedicure tool kit but it was love at first file – much like using a glass nail file!! If you haven’t tried Glass Files you are missing out. I highly recommend THIS GLASS FILE SET which includes all my favorites glass files and glass cuticle pusher that you’ll see me mention throughout this post! Unlike the ‘cheese grater’ style a glass foot file is much more gentle but just as effective. I use my glass foot file on dry feet in-between pedicures when I noticed my heels are looking dry.
Rinse your feet throughly after removing the dead skin and wash with soap & dry your feet with a clean towel.
Pro Tip: In addition doing a PHYSICAL exfoliation with a foot file, I also strongly encourage you to add an ACID EXFOLIATION to your pedicure routine (FYI this also applies to your facial skin care routine, acids are amazing).
My Favorite Acid Exfoliators for Pedicures
By default if you are already using an acid exfoliator on your face, you can use that same product on your feet!! For me adding an acid treatment regularly prior to moisturizing (as well as included in my moisturizer) made a world of difference in maintaining smooth & soft feet.
If your facial skin is sensitive and you don’t use an acid OR are using a very mid one, since the skin on your feet is much more durable you can use a stronger product. These are my favorites:
- The Ordinary 7% Glycolic Acid Toning Solution – this was the first acid I added to my pedicure routine since I had it on hand already as a part of my skincare routine. It’s an affordable and a very effective product.
- 35% Glycolic Acid Peel Pads – I use these 2-3x a week prior to applying moisturizer. The are convenient to keep in my nightstand, no extra cotton pads needed to apply. I wanted something stronger than what I was using on my face.
- The Ordinary Peeling Solution, applied to your feet instead of your face. You may of seen this trick on TickTok too! I use this when I give myself a full pedicure, leaving it on as a bottom of my feet mask for 10 minutes.
My Favorite Foot Lotions
We’ve soaked our feet & throughly exfoliated, now it’s time to apply moisturizer!!! Again, I didn’t just grab a moisturizer off the shelf, I have actually put in time researching HOW to best moisturize your feet – especially if you struggle with chronically dry scaly skin on your feet (like psoriasis).
There are a few ingredients to look for in a foot moisturizer for the best results; Urea and Salicylic Acids. Urea helps to lock in or seal in the moisturizer and, yes back to the acids, they help to prevent dry flaky, scaly skin in the first place! Additionally, using an Occlusive moisturizer (aka slogging) is a great addition to your pedicure routine!
- Olive and June Foot Serum is what I apply as a part of my pedicure routine and after I shower it’s light weight and doesn’t leave a greasy or heavy coating. (also included in the Olive and June Foot Care Essentials Set)
- Olive and June Heel Balm is a better alternative to using occlusives like Vaseline, I like to apply this directly to my heels to lock in the serum during a pedicure without adding a bunch of extra oil to my toe nails prior to painting. (also included in the Olive and June Foot Care Essentials Set and Pedicure System)
- CeraVe Moisturizing Cream for Psoriasis Treatment | With Salicylic Acid for Dry Skin Itch Relief & Urea for Moisturizing – This is the moisturizer I use most often on my feet at bed time. It offers immediate moisturizing as as well as preventing my heels from getting thick and rough.
Take your time when applying lotions or foot cream to your feet to pamper yourself as a part of your natural pedicure beauty treatment! Focusing on massaging the balls of your feet and any sore foot muscles.
My Favorite Things for Painting your Toenails
To be completely honest, painting your toenails is no where near as complex as painting your finger nails. Polish naturally stays better on your toes than on your fingers since they aren’t exposed to damage as much – washing dishes, using your nails as tools, frequent hand washing, etc.
There’s a general flow to follow when painting your toe nails and I think that Olive and June does an AMAZING job showing you the right way and all the tips & tricks to upgrade your technique to look like it was done by a professional. The education that Olive and June provides (along with putting all the tools together in their pedicure system) is what makes them stand out as the best brand of nail polish in my opinion.
I highly recommend purchasing the Olive and June Pedicure System – which comes with your choice of 1 or 6 colors (that you can pick individually or go with there current seasonal collection) to get your own pedicure tools in an easy and inexpensive way.
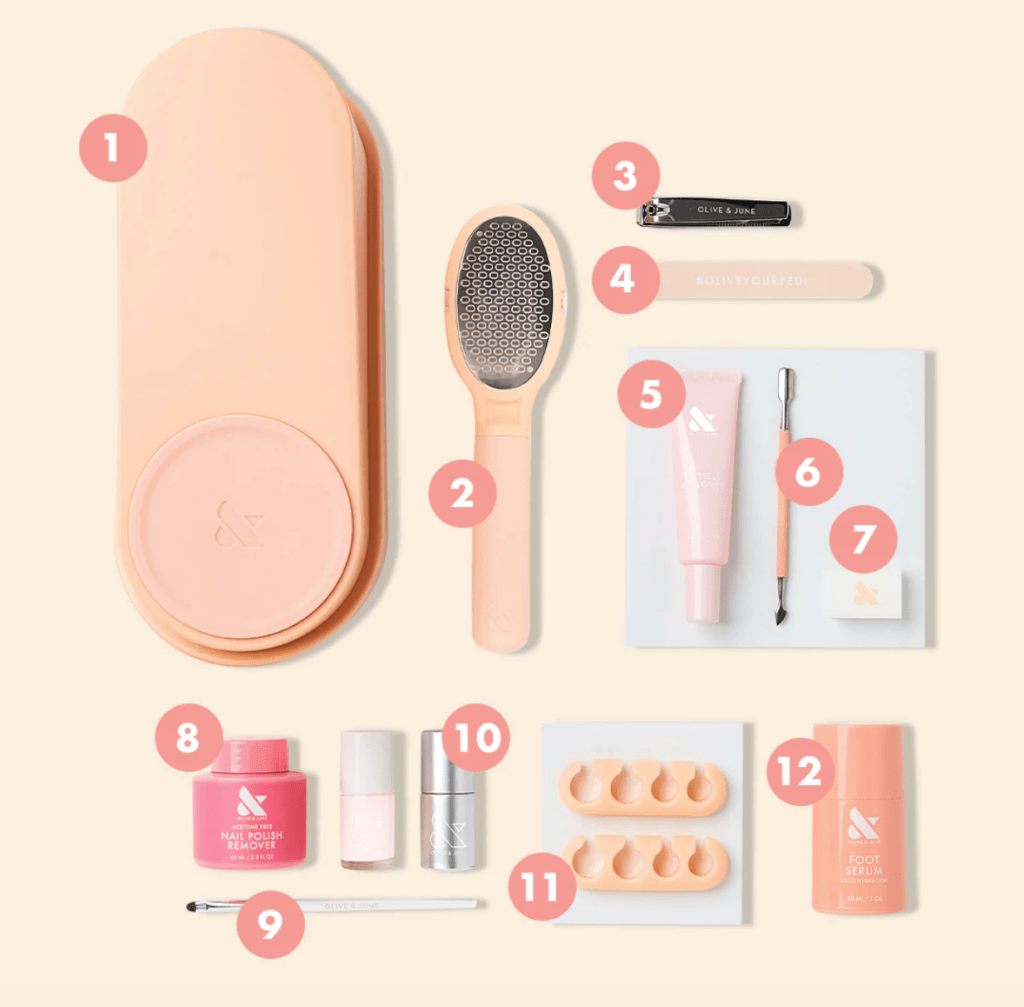
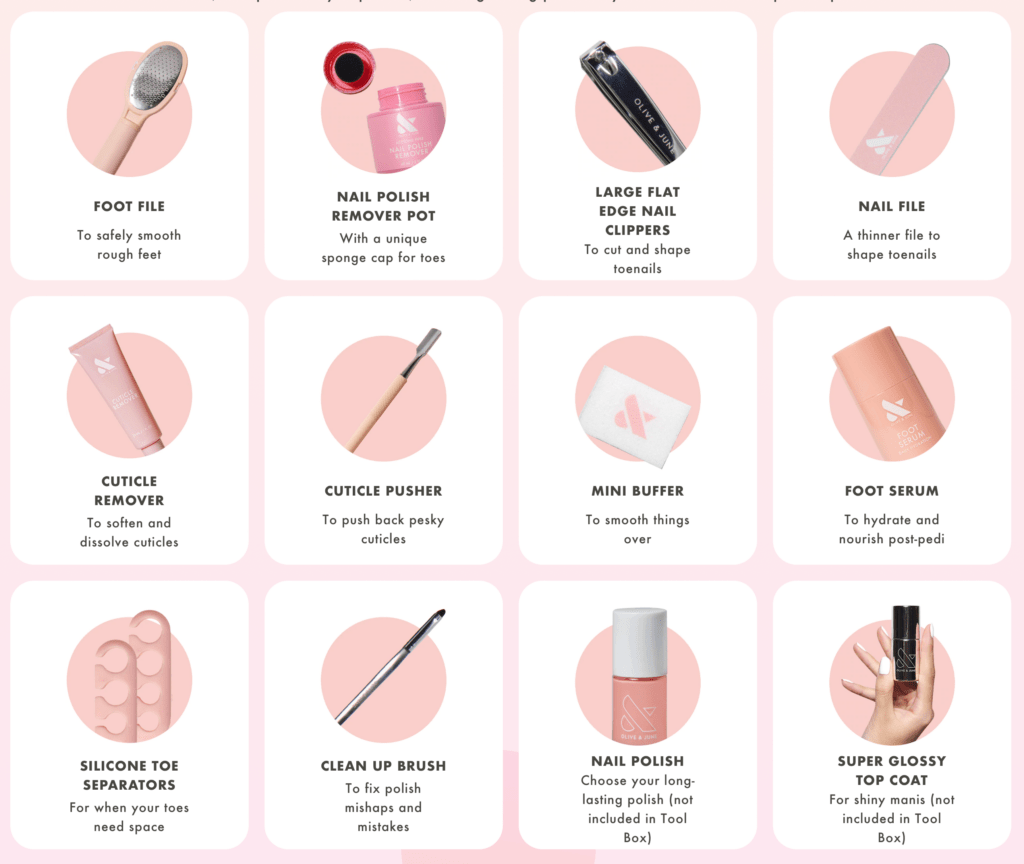
What’s included in the Olive and June Pedicure System
- THE POSEY (helps to hold your foot at the perfect angle)
- Smoothing FOOT FILE
- Straight-edge NAIL CLIPPER
- Dual-grit NAIL FILE
- Softening CUTICLE REMOVER
- Game changing CUTICLE PUSHER
- Salon-quality NAIL BUFFER
- Acetone-free POLISH REMOVER POT
- Pedi-perfecting CLEAN UP BRUSH
- SUPER GLOSSY TOP COAT
- Limited-Edition PINK TOE SEPARATORS
- Hydrating FOOT SERUM
- PLUS long-lasting, 7-free polish of your choice ( with the option of 1 or 6 colors, if you need help choosing colors, please don’t hesitate to reach out, I own every color and am always glad to help)
After selecting your nail polish(s) you have the option to add on products at a discount and I also suggest the Olive and June Dry Drops, if you are impatient like me and struggle to sit still while your polish is drying.
If you personally have toe nails that are textured or have ridges, using the Olive and June Ridge Filler is extremely helpful for getting that salon smooth polish.
You can get 20% off Olive & June’s Pedicure System, Manicure System, Complete System (both mani & pedi) Mani Weekend System or Press On System using my code: HAYLEYN20
I highly recommend grabbing a system from Olive and June, I made the mistake of initially purchasing items separately but ended up costing myself more money and wasting time. The systems are everything you need PLUS they save you money compared to purchasing items individually.
In my next post in this series My Favorite Things for a Manicure, I’ll go into greater depth in the painting process step by step. But in a nut shell here’s a basic step by step overview, After soaking, exfoliating and moisturizing your feet, it’s time to start working on those toe nails:
- Start by cutting your nails to your desired length using nail clippers and filing the free edge into your desired shape.
- Next apply cuticle remover and gently push them back with a cuticle pusher, trimming any excess skin with cuticle nippers. Investing in a pair of professional-grade Staleks nippers from https://foxnailsusa.com/ makes this step much safer and more precise, ensuring you don’t accidental nick your skin while achieving a salon-ready look
- Gently buff the surface of your nails to smooth and wipe with nail polish remover or rubbing alcohol on a cotton pad or cotton ball to remove any oils prior to painting & put on toe separators, if desired.
- Paint nails with Olive and June Ridge Filler to smooth out any texture and allow to dry 2-3 minutes – no base coat is required otherwise when using Olive and June Nail Polishes.
- Apply 2 thin coats of your favorite Olive and June Polish color, allowing each coat to dry 3-5 minutes inbetween. (f you need help choosing nail paint colors, please don’t hesitate to reach out, I own every color and am always glad to help)
- Use a clean up brush dipped in nail polish remover* to clean up your cuticle line or any polish messes, before applying your top coat. Using the help of the brush at the base of your toenails & nail beds to clean up any messes, really makes a big difference!! Don’t skip it!
- Apply Olive and June Super Glossy Top Coat and allow to dry 2-3 minutes before adding a one Olive and June Dry Drops to each toe. Your nails will be mostly dry and you can walk around but be careful for the next 15-20 minutes before putting on shoes or socks. For extra shine you can add tin layers of top coat every few days.
As a final step after your polish is complete dry apply a little cuticle cream, cocoa butter or cuticle oil to the area around your nails for extra moisture, if desired. I do this on my nails but not always on my toenails.
You can visit the Olive and June website and under LEARN you can find opportunities for their video archives, Bootcamps and Masterclasses.
If you are for alternative to the Olive and June products, below are products that I also highly recommend:
- Sally Hansen Cuticle Remover
- Clean Up Brush
- Ella + Mila Soy Nail Polish Remover
- Glass Cuticle Pusher & Glass Nail File
- Essie Dry Drops
- ella+mila Ridge-Filler Base Coat
- Other nail polish brands I use and recommend are Holo Taco, Glisten and Glow, Kb Shimmer and MoonCat, but 90% of the time I stick to Olive and June.
Now that you’ve learned the simple steps for an at home pedicure what questions do you have? I’m always eager to help, especially when it come to easy ways to do a natural manicure or pedicure! I always try to stick to safer products and natural remedies but occasionally it’s fine to choose performance over principle.
Here are a few other posts you might want to check out next:
- How to Clean with Hydrogen Peroxide
- Whipped Tallow Facial Cleanser
- DIY Homemade Aromatherapy Necklace
- Skin Perfecting Spray Toner
*can be a gentle nail polish removers or acetone polish remover, both work for nail polish clean up.