The World’s Best Gluten-Free Bread Dough
 You can say that I’m definitely taking one for the “team” with this recipe. I’m stepping outside of my grain-free comfort zone to create a delicious and highly versatile Gluten-Free Bread Dough.
Some of you are probably asking why if I stay away from grains (other than some occasional rice) would I want to make a Gluten Free Bread?! The answer is really easy, I’m not perfect but I do have celiacs and a gluten free bread is an acceptable deviation from grain-free perfection for me as an occasional treat. However, the gluten free bread products are the store are really awful and chock-full of questionable ingredients that I’d rather avoid.
Now, do understand that this bread isn’t something that should be eaten as a regular part of your healthy diet BUT I’d definitely rather you give into your craving with this homemade gluten free bread instead of the stuff at the store or worse yet eating gluten!
This recipe is the FIRST in a series that I’ll be sharing, this is only for the basic dough. This Gluten Free Bread Dough will be used in several upcoming recipes for Sandwich Bread, Crusty French Baguettes, Bread Bowls for Soup, Pizza crust, etc. Trust me this will be your go-to Gluten Free Bread Dough Recipe and it’s so very easy to make in your food processor or stand mixer.
BUT WAIT – you can make it up to 7 days ahead of when you want to use it and one batch can be used in several different ways! One batch made us 3 loaves of French Baguette and 1 pizza crust. That’s why I’m calling it the The World’s Best Gluten-Free Bread Dough.
Before we get to the recipe itself, I do want to tell you a few tips & tricks….
- First of all, if you have any questions regarding the ingredients I’ve used, feel free to click the links in the recipe to see the exact brands I recommend.
- At this time I have not experimented with any ingredient substitutions, so please don’t ask but feel free to comment on this post with any substitutions that you try even if they didn’t work to help others.
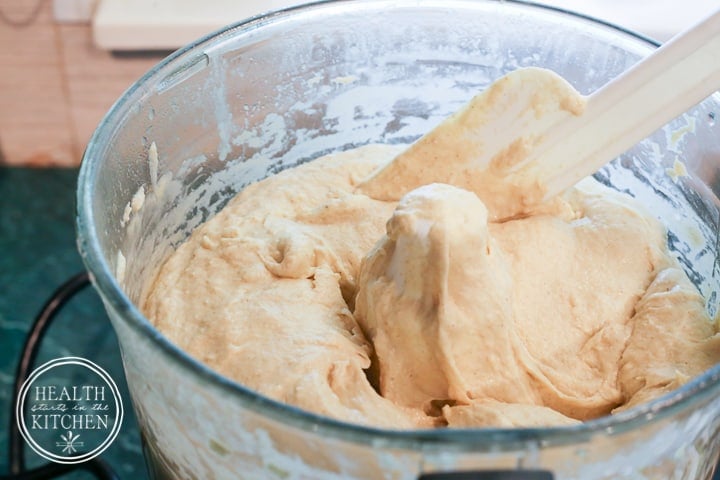
- I’ve made this dough 3 times, all of which have been made in my food processor using the dough blade however I’m confident the results will be the same if you use a heavy duty stand mixer fitted with a paddle. You can mix it by hand but it will be lots of work, that honestly takes away from the appeal of this dough.
- In theory you should be able to half or double this recipe but I have not tried it yet.
- You cannot over work this dough since it does not contain gluten, feel free to overmix it 🙂
- If it’s summer and the air conditioning is running constantly (like ours is) I placed my dough outside to rest. If t’s cold in the winter, you can let it rest in a warmed oven (turn oven on to 200 for 2 minutes then shut off and put dough inside).
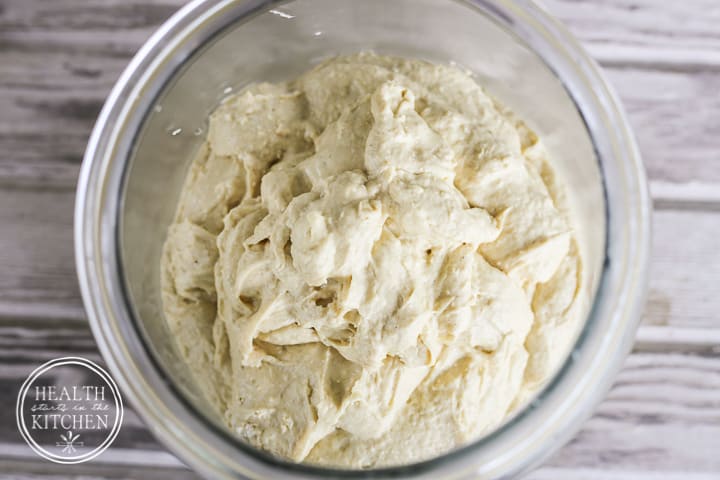
- This dough will NOT be the same texture of a gluten-contaning dough. It is looser/softer, more of a very thick batter, don’t panic. If your dough is too dry add a little additional water if it’s too runny add a little more tapioca starch. Make sure it is smooth and not lumpy.

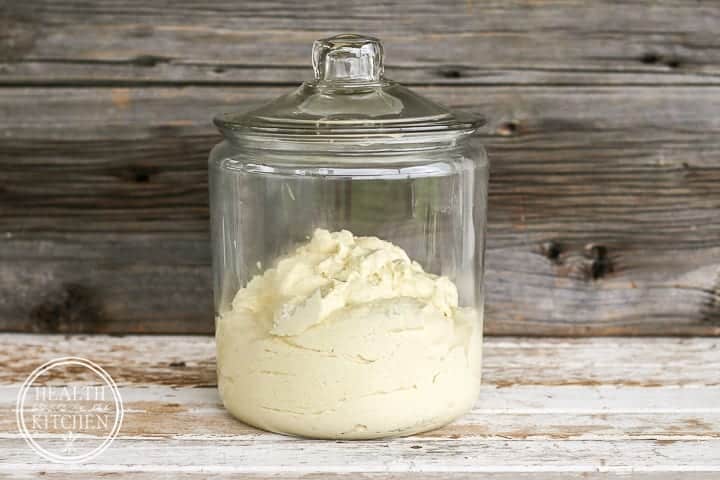
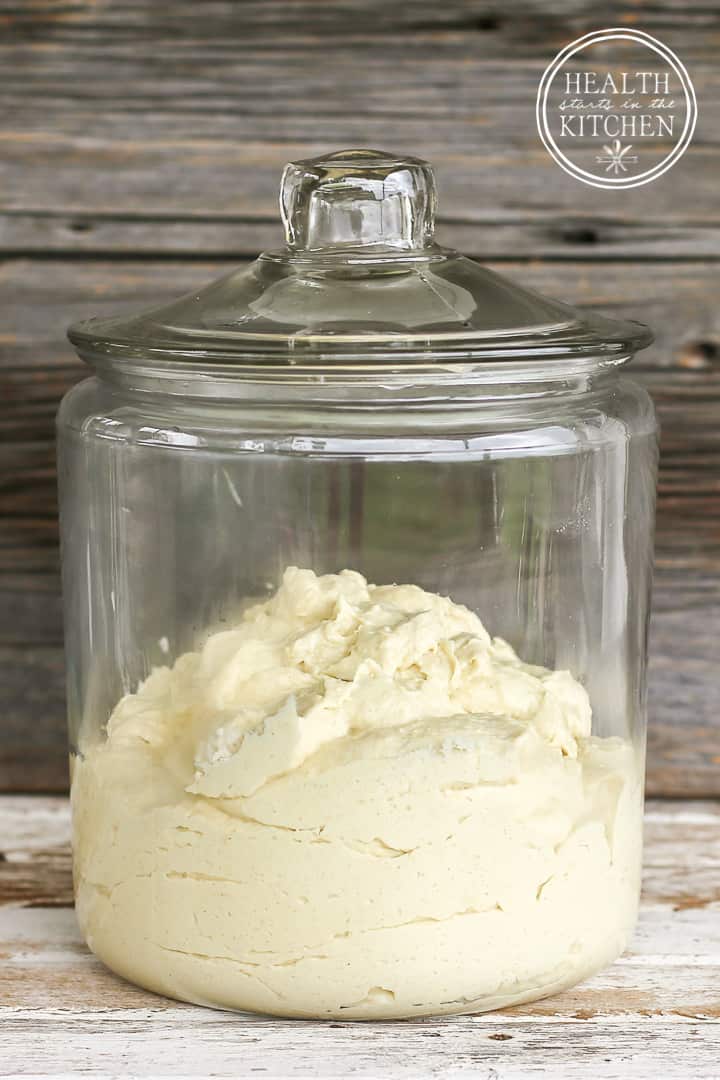
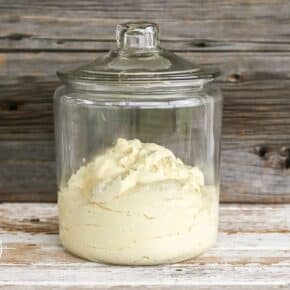
- I recommend resting and storing your dough in a 1 gallon glass canister. I keep several of them on hand for kombucha and they work perfectly for this dough. Whatever you store it in cannot be have an air tight lid, this dough must breath, the glass lid that comes with the canister works perfectly.
What recipes do you want to see me create using this dough recipe?? Please comment below so that I can add them to my list!
Ingredients
- 2 cups organic brown rice flour
- 1.5 cups sorghum flour
- 2 cups Tapioca Starch
- 1 cup organic potato starch
- 2 tbsp active dry yeast slightly rounded
- 1 tbsp Sea Salt heaping
- 2 tbsp xanthan gum
- 3 cups Warm Water, filtered roughly 90 degrees
- 4 large eggs
- 1/3 cup avocado oil
- 2 tbsp Honey
Instructions
- In a large bowl, combine dry ingredients. Mix well using a whisk.
- Combine liquid ingredients in a 14 cup food processor fitted with dough blade or a heavy duty electric mixer fitted with a paddle.
- Working in batches, gradually add dry ingredients into the liquid, until well incorporated. The 'dough' will be thinner than a traditional wheat-containing dough, more closely resembling a thick batter.
- Transfer dough to a 1 gallon glass canister (with non-airtight lid) or other similar vessel. Allow the dough to rest at room temperature for 2 hours or until it doubles/fills the 1 gallon canister.
- The dough can be used immediately after resting or it can be refrigerated (in a non-airtight container) to be used in the next 7 days.


I.m allergic to wheat and rice so I switch the rice flour for cassava flour next time I’m having the recipe just me and my husband so to much dough
I was looking for a flour blend similar to the ingredients listed on Canyon bread wrapper that doesn’t include white rice flour and yours fits the bill. Thank you for all your tries to get it correct. I want to know if this bread flour recipe would work for bagels?
I actually have an amazing Grain Free Bagel recipe that you might like!
I just met this recipe and have one question before I start. . .how do you measure your flour?
I usually weigh flours in grams. US cups are smaller than metric cups and so many recipes don’t quite work. Help😳🙄☺️
for gluten free baking you always want to scoop into the flour and then swipe the excess from the top of the measuring cup.
Do you have any suggestions for replacing the potato starch? I can’t have nightshades in addition to gluten.
You can Other starches, like tapioca, arrowroot, etc
Hi, thank you for the awesome recipe. I have tried it and the loaves came out great. It taste better than regular bread. I would like to experiment the dough with other bread recipe.
Can you make fryed bread with recipe
that would work great!
I like the Hawaiian Sweet Bread that is Gluten Free. The only place I have found it is Walmart, so when I go, I buy 2 loaves. That’s about $10.00. So sad it has to cost that much. I’d like a recipe for that, but I thought brown rice flour makes it taste gritty. Another thing I’ve found is that my loaf is always gummy and thick at the bottom of the bread loaf. Why is this? I like this white bread, some I’ve bought aren’t worth eating and I always have to toast it. I haven’t found any I like not toasted for sandwiches. And I miss them so much.
This truly is the Best GF Bread Dough. Ever. Been making it for years now. Thank you for sharing it.
This comment is for Geri in regard to the brown rice flour question: I have the same issue with my stomach. I think it’s the lectins because any grain containing lectins I can’t process. I’m going to try this recipe with Cassava flour. I’ll post how it works out. Cassava is 1-1 same as wheat, so I think it will work. I never have issues with cassava flour.
Brown rice flour blows my stomach up like wheat does. Do you have a recipe w/ the brown rice flour!
I don’t sorry.
Has anyone managed to make this with an egg substitute like flax eggs?
At what temperature and how long do you bake a loaf of bread?
Haley, thank you for all the wonderful nutritious recipes. Today I made the world’s best gluten-free bread and it came out perfect! I used the exact ingredients, a millwork heavy-duty stand mixer with paddle and baked two nice size loaves in a countertop air oven 330 f for 1 hour. I cut one loaf open and it seemed to be very moist, is this normal? Next I want to try this basic bread dough and swirling and some cinnamon and raisins just before letting it rise. I’ll let you know how this turns out because I didn’t see anybody else try this.
What I like about this basic gluten free bread recipe is that and in just one hour it made 5 quarts of dough and next time I will make extra dough to put in the fridge.
Is this a dough that can be rolled out and worked with?
It can be used like traditional
Bread dough In most applications
Pls make a gluten free Hokkaido milk bread recipe
Thanx for the recipe would like to try but I wanted to ask you….How do you measure your flours?
Do you spoon the flour into the cup? Do you scoop the flour from the bag with the cup measurement?
You don’t activate the yeast in warm water in your instructions. Will this work with active dry yeast if I don’t activate in warm water first?
The recipe works perfectly as written.
I recently bought a Pullman and can’t wait to try this dough. I have all the ingredients except the yeast. Which brand do you recommend?
There really isn’t much difference in yeasts unless you get to a sourdough starter. I just grab it at the grocery, I do like the bulk in a jar opposed to packets.
Sorry to say that I also cannot get to the bred dough recipe. It only shows a long blank box. Is there any way tht the recipe can be sent to my email? I truly Need to learn how to make this dough. I have to try away from gluten, dairy, acid, msg,preservatives and caffeine. Any help in getting the recipe would be appreciated. I signed up for your newsletters also. Looking forward to them, thanks!
the recipe is included in the post and working ok. try again!
I see a blank white rectangle on this page after your first descriptive paragraphs. The last thing I see is the jar with the dough in it. I can’t see the recipe! Is it written down elsewhere? I have the Pullman pan and a granddaughter who is very sensitive to wheat. I wanted to try the sandwich loaf for her.
There is nothing wrong with the post, if the issue persists reach out to your internet service provider.
I figured it out at least for me. I am looking at this on my Ipad in the horizontal mode. Just for the heck of it, I turned it to vertical and the recipe showed up in the box correctly!!
What would a substitute for potatoe starch be? I’m unable to use it as I am anaphylactic to potatoes. Just new to being celiac – so trying to navigate my way and discovering I can’t buy off the shelf ANY GF bread product.
you can try using arrowroot in place of the potato starch.
Maybe I missed it, but do not see temp and cook time for this recipe.
This is only the dough. You use it in other recipes
Hayley I am so excited to try this recipe! I have a very rare autoimmune disease and have to watch every thing I eat. So trying to feed my husband and three boys as well delicious food that I can eat has been a challenge. This is exactly what I’ve been looking for!!! I even have time to perfect it before school starts! Thank you for sharing your hard work ♥️♥️
I have tried this recipe 2 times, once with substitutions and once completely by the recipe. I have had no where near enough liquid. Any ideas? Am I measuring the flour wrong? Scoop in measuring cups or pour/spoon into measuring cups? Argh. I really want this recipe to work and what I have made has tasted good, but both times I have had to move from my 14 cup food processor to a bowl halfway thru bc of not enough liquid/too much dough…
with gluten free flour, you want to use the scoop and scrape method. Scoop the flour with the measuring cup, do not pack in. then use a straight edge (of a butter knife works) to level the top. Spooning into the measuring cup won’t give you enough flour
How many carbs in a slice of this bread ¿
This looks amazing! I don’t think I’ve ever tried sorghum flour. What is the best kind?
Can I substitute some of the water with ale?
Ale – as in beer – contains gluten so if you are making a gluten free bread, that’s a no.
Hi Haley. Thanks for posting your delicious looking bread recipe! 3 questions
1. Can I use yeast from a traditional yeast packet and is 2 TBSP = 1 yeast packet or 2?
2. Can I allow this to rise with a sheet of plastic wrap as the cover –just resting on dough but not sealing the edges of the bowl?
3. This is a huge recipe, can I cut it in half exactly?
Thanks so much!
1. The packet of yeast will tell you how much is in it, use that as yiur guide.
2. Sure
3. Sure
This looks like a great GF dough! Have you ever used it to make pull apart rolls?
I have not made pull apart rolls, if they work for you please comment with your tips!
Can this be made without the starches? Potato starch has a lot of oxalate, something that causes kidney stones in my husband. I’ve never looked into the content of tapioca. I wonder if I could ground oat meal in place of starches? Any thought on that?
You are welcome to use my recipe to create one that works better for you. Potato starch produces a light and fluffy result.
Because of a corn allergy, I m not able to use xanthan gum. I’m guessing that there is no good substitute. I can’t do guar gum or other artificial thickeners, either.
just omit and let me know how it works!
There is a product called not xanthan I use for other baking and it works well. Could try it.
I have tried several gluten free dough recipes and none seem to work? The problem I seem to have is I am trying to make cinnamon cresont rolls for my daughter, so far I have yet to find one where it will raise. The dough seems more compact, gets hard and don’t seem to want to raise. I have tried 4 or 5 different ones so far, maybe more? none has worked yet.
That is why I am skeptical on trying anymore?
am I don’t something wrong or is it the recipe?
sounds like you have a yeast issue.
Hi- excited to try this! After it rises in the glass jar, did I read somewhere in the comments you need to “punch” it down? And then let it rise again in the bread pain? I have never made bread before and have read your instructions over and over and don’t see that step. Many thanks in advance!
when you move the dough from the container to the bread pan, by default it gets punched down.
Anybody knows if could I replace sorghum flour with something else or avoid it completely. For some strange reason, I can’t find sorghum flour where I live.
Oat flour would probably work. Grind up rolled oats in a blender.
Just made the dough. It’s sitting on my counter right now, rising. I plan to try making some dinner rolls in the morning. Any ideas about how much dough per roll or how long I might need to bake them?
I’d probably use golf ball sized portions of dough. Bake 350 for 20+ minutes or until they are brown on the top and sound hollow when tapped.
Would substituting coconut oil melted work instead of avacado…. I’m going to try that. Also would letting it rise in a mixing bowl with like a towel over it work? I don’t have a Jr like u explained and didn’t want to have to spend the money on one.
I also have a gluten free flour blend that I got from the store. It contains while grain sorghum flour, brown rice flour, whole grain millet flour, rice flour, food starch modified whole grain quinoa flour and xanthan gum. Would it be possible to substitute this mix for yours….?
Mylee – sounds like you’re wanting to create your own recipe, using what ingredients you have on hand 🙂 I welcome you to use my recipes as a starting point for your own development. Be sure to check back and let us know what works (or doesn’t) for you.
I didn’t see any information pertaining to temperature and time to bake. I realize it may be different depending on the size of the bread pan. What were your temp and time results?
Also, could this same recipe be used to make dinner rolls, cinnamon rolls, etc?
This recipe is for the DOUGH only… I have links to using it for sandwich bread and pizza crust in the post. In general I recommend baking all breads at 350 until they are lightly browned and they sound slightly hollow when done. This dough can be used for virtually any application.
Hi, may i use something else to replace the avocado oil?
olive oil works great too.
It’s warm in Texas. This dough was popping out of the topic about 30 mins!! Used the same jar. 😉 smells like wonderful regular dough can’t wait to bake with it! For those wondering I used the exact recipe no substitutions. All items where gmo free organic from my local farmers market store.
How long do you bake this loaf and at what temp?
https://healthstartsinthekitchen.com/recipe/worlds-best-gluten-free-sandwich-bread/
Hi, could I switch the avocado oil with olive oil? Thanks
sure.
This bread sounds amazing and I am excited to try it. Is it necessary to refridgerate this dough? Could I just mix it uo and bake it?
See recipe instruction #5
Hi Hayley,
I’m just wondering, can i put the rest of the dough in the freezer?? and then use it for my next baking.
I have not tried freezing the dough from this recipe so I cannot speak to if it works or not.
Hi there, I thought you could not knock back gluten free bread mix ( one rise) so therefore when you move this mix from the glass container to loaf tin would it not collapse?
I cannot speak to every GF recipe, but this recipe you indeed punch down the dough just like gluten containing
Thank you so much for this recipe, Hayley! I substituted the sorghum flour with fine white rice flour because I did not have any sorghum flour, and the loaf was the best GF bread I have ever made…I have made thousands of loaves and this was the best by far!
I have to ask something about the time in the refrigerator: many of the popular bread books state that enriched dough should not be kept in the fridge for more than 5 days but your recipe states up to 7 days – why? Is there something in this recipe that keeps the dough stable for longer?
I’m sorta confused by ‘enriched’ breads being kept for no more than 5 days – so at 5 days you toss them? I’ve never in my life gave any concern to a pre-established time frame for homemade breads, with or without gluten. Honestly, if I’m not using up a loaf of bread in a week, then it goes into the freezer or transformed into bread crumbs.
Hi Hayley…I completely agree when it comes to the bread itself – older bread makes decent toast, and even older bread goes into the freezer for crumbs! I was actually asking about the dough’s time in the refrigerator and its stability after 5 days since it has eggs in it. Something about food safety, if I remember correctly.
Anyway, I guess it’s a moot point since I used up all the dough in 2 days!
Would this work in a bread machine?
This recipe has not been tested in a bread machine.
Usually you only let gf bread rise once so I’m a little confused. Do you let rise in the jar, put it in the frig. When ready to use put it in the pan and let it rise again? Then bake? What temperature and how long?
The answers to all of your questions are in the recipe(s). This is made like a traditional bread dough, with a double rise. I make several GF breads that require Rising, punch down/form, rise – it’s a standard process.
Hayley, will this recipe work with my usual go to which is sprouted organic brown rice flour? Do you think it would be the same measurement of regular brown rice flour you call for? I really want to make this. All of your recipes always turn out really well! Thank you! ?
Thanks Holly! The sprouted should work the same. Please let me know how it turns out!
Can I substitute the eggs with flax eggs?
Rosanna – I honestly have no idea if flax eggs will work in this recipe since I have not tried it and haven’t worked much with egg-substitutes. If you try them, please be sure to let me know if it works out.
How many loaves does this make??? Or is this just for one loaf??
Thanks
It depends on the size/shape of the loaf you make. I’d estimate 3-4 loaves.
Is it possible to substitute something else for the honey in this recipe?
Sure – Maple Syrup, Organic Cane Sugar, etc.
Why do you have to have eggs ?
Why do I personally have to have eggs or why does the recipe call for eggs? I’m not sure what you are asking. Gluten free baking is very different from traditional wheat baking, eggs can help to replicate gluten textures.
Ground flax seed and water mixed is an egg substitute! Not sure on measurements tho.
1 TBSP of ground flax to 2 Tbsp of water = 1 egg
I have substituted flax eggs for regnin many gluten free recipes. I haven’t tried this one yet but looking forward to trying It ! Thanks!
Im allergic to yeast can i use baking powder instead and if i can how mutch?
this is a yeast bread, I sorry but I cannot offer you baking powder conversions.
Can I just bake this dough in a loaf pan for a gluten free bread?
yes but I can’t give you time/temp 🙂
After reading through the entire article and getting very excited about this recipe I was then devastated to see sorghum in the ingredients. Many coeliacs including myself react to sorghum as if it were wheat. Unfortunately I learned this the hard way.
Tracie – I’m sorry that you react to sorghum 🙁 I react to quinoa, many people react to rice and corn. For most people with celiacs it is best to avoid ALL GRAINS to achieve optimal health and healing – and adjusting your healthy eating based on your unique body.
I would love a recipe for a good bun for burgers/chicken! It is so hard to find a good gluten free bun!
What do you mean by “non air tight container?” All my lids are fairly tight–do I need to create some sort of air release?
Kris – I recommend using a 1 gallon glass canister with the glass lid it came with. It does not seal air tight… And air-tight container would be a canning jar with a tight fitting lid or a plastic tupperware container with a sealed lid for the freezer. Is that any clearer? I link to the glass canister in the post and they are readily available at retailers like target and walmart for less than $10
Yes, and if it comes with that plastic soft “gasket”, you can easily peel it off with a butter knife, your fingernails:) or any other number of implements, including cutting the edge with scissors and then pulling it off.
Can I leave out the SALT? I’m on a low-sodium diet, and breads and things contain a lot! A Teasponn has like 1 or 2 thousand mg. of sodium.
Kate – I suggest you throughly research low-sodium diets. Sodium from natural, real sea-salt is extremely healthy and beneficial. http://articles.mercola.com/sites/articles/archive/2003/07/26/sodium-recommendations-part-one.aspx#!
https://chriskresser.com/specialreports/salt/
Sodium…Really Iodine. makes DH Rash itch like there will not be a tomorrow.
Would love to see the bread bowl for soup!! Thanks so much for sharing this recipe I cannot wait to try it.